COVID-19: Face Mask Detector

Currently, the whole world is affected by COVID-19 pandemic. Wearing a face mask will help prevent the spread of infection and prevent the individual from contracting any airborne infectious germs.

When someone coughs, talks sneezes they could release germs into the air that may infect others nearby. Face masks are part of an infection control strategy to eliminate cross-contamination.
COVID-19: Face Mask Detector
Photo by Syril Bobadilla on Dribbble

This Face Mask Detection system built with OpenCV, and TensorFlow using Deep Learning and Computer Vision detects face masks in real-time video streams.

Two-phase COVID-19 face mask detector
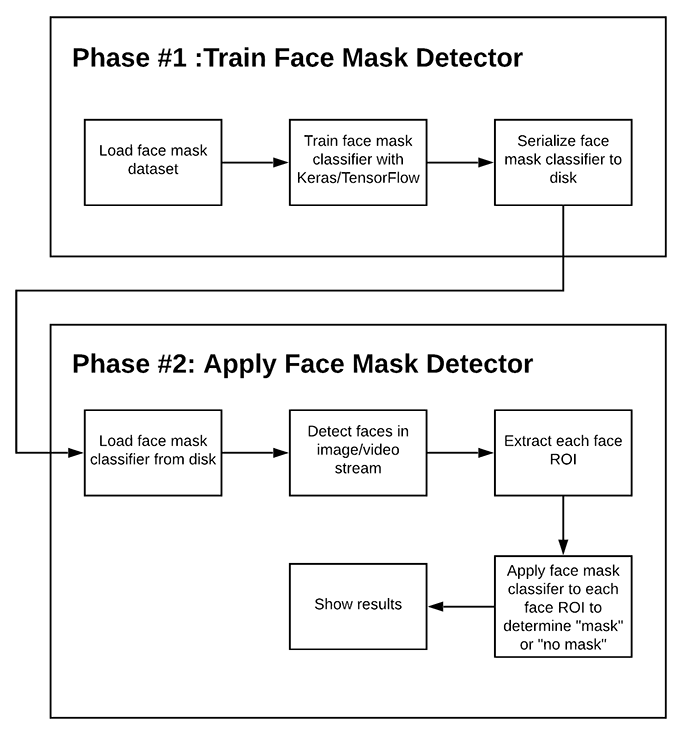
Phases and individual steps for building a COVID-19 face mask detector
Phases and individual steps for building a COVID-19 face mask detector(source: PyImageSearch)

In order to train a custom face mask detector, the project is divided into two distinct phases, each with its own respective sub-steps :

  1. Training: Here we’ll load our face mask detection dataset from disk, train a model (using TensorFlow) on this dataset, and then serializing the face mask detector to disk
  2. Deployment: Once the face mask detector is trained, we can then load the mask detector, performing face detection, and then classifying each face as with_mask or without_mask.

Dataset

Dataset Used for this project is Face Mask Detection Data from Kaggle. It is a data of 3833 images belonging to two classes:

  • with_mask: 1915 images
  • without_mask: 1918 images

Implementing COVID-19 face mask detector training script

To train a classifier to automatically detect whether a person is wearing a mask or not, we’ll be fine-tuning the MobileNet V2 architecture, a highly efficient architecture that can be applied to embedded devices with limited computational capacity (ex., Raspberry Pi, Google Coral, NVIDIA Jetson Nano, etc.).

In order to proceed we will :

1. Import all the dependencies and required libraries.

from tensorflow.keras.preprocessing.image import ImageDataGenerator
from tensorflow.keras.applications import MobileNetV2
from tensorflow.keras.layers import AveragePooling2D
from tensorflow.keras.layers import Dropout
from tensorflow.keras.layers import Flatten
from tensorflow.keras.layers import Dense
from tensorflow.keras.layers import Input
from tensorflow.keras.models import Model
from tensorflow.keras.optimizers import Adam
from tensorflow.keras.models import load_model
from tensorflow.keras.applications.mobilenet_v2 import preprocess_input
from tensorflow.keras.preprocessing.image import img_to_array
from tensorflow.keras.preprocessing.image import load_img
from tensorflow.keras.utils import to_categorical
from sklearn.preprocessing import LabelBinarizer
from sklearn.model_selection import train_test_split
from sklearn.metrics import classification_report
from imutils.video import VideoStream
from imutils import paths
import matplotlib.pyplot as plt
import numpy as np
import argparse
import os
import cv2
import time
import imutils
view raw libraries.py hosted with ❤ by GitHub

2. Load and label the images in the Dataset.

3. Prepare the inputs for the Model

# partition the data into training and testing splits using 75% of
# the data for training and the remaining 25% for testing
(trainX, testX, trainY, testY) = train_test_split(data, labels,
test_size=0.20, stratify=labels, random_state=42)
# construct the training image generator for data augmentation
aug = ImageDataGenerator(
rotation_range=20,
zoom_range=0.15,
width_shift_range=0.2,
height_shift_range=0.2,
shear_range=0.15,
horizontal_flip=True,
fill_mode="nearest")
view raw inputs.py hosted with ❤ by GitHub

4. Construct and compile the Model

# loading the MobileNetV2 network, ensuring the head FC layer sets are left off
baseModel = MobileNetV2(weights="imagenet", include_top=False,
input_tensor=Input(shape=(224, 224, 3)))
# constructing the head of the model that will be placed on top of the base model
headModel = baseModel.output
headModel = AveragePooling2D(pool_size=(7, 7))(headModel)
headModel = Flatten(name="flatten")(headModel)
headModel = Dense(128, activation="relu")(headModel)
headModel = Dropout(0.5)(headModel)
headModel = Dense(2, activation="softmax")(headModel)
# placing the head FC model on top of the base model (this will become the actual model we will train)
model = Model(inputs=baseModel.input, outputs=headModel)
# loop over all layers in the base model and freeze them so they will not be updated during the first training process
for layer in baseModel.layers:
layer.trainable = False
# compiling our model
opt = Adam(lr=INIT_LR, decay=INIT_LR / EPOCHS)
model.compile(loss="binary_crossentropy", optimizer=opt,
metrics=["accuracy"])
view raw model.py hosted with ❤ by GitHub

5. Train the Model and make predictions on the testing set

# training the head of the network
H = model.fit(
aug.flow(trainX, trainY, batch_size=BS),
steps_per_epoch=len(trainX) // BS,
validation_data=(testX, testY),
validation_steps=len(testX) // BS,
epochs=EPOCHS)
# making predictions on the testing set
predIdxs = model.predict(testX, batch_size=BS)
# for each image in the testing set we need to find the index of the label with corresponding largest predicted probability
predIdxs = np.argmax(predIdxs, axis=1)
# Creating a classification report
print(classification_report(testY.argmax(axis=1), predIdxs,
target_names=lb.classes_))
view raw training.py hosted with ❤ by GitHub

6. Plot the training loss and accuracy

N = EPOCHS
plt.style.use("ggplot")
plt.figure()
plt.plot(np.arange(0, N), H.history["loss"], label="train_loss")
plt.plot(np.arange(0, N), H.history["val_loss"], label="val_loss")
plt.plot(np.arange(0, N), H.history["accuracy"], label="train_acc")
plt.plot(np.arange(0, N), H.history["val_accuracy"], label="val_acc")
plt.title("Training Loss and Accuracy")
plt.xlabel("Epoch #")
plt.ylabel("Loss/Accuracy")
plt.legend(loc="lower right")
view raw plot.py hosted with ❤ by GitHub

Implementing our COVID-19 face mask detector in real-time video streams with OpenCV

1. Define face detection/mask prediction function

def detect_and_predict_mask(frame, faceNet, maskNet):
# grab the dimensions of the frame and then construct a blob
# from it
(h, w) = frame.shape[:2]
blob = cv2.dnn.blobFromImage(frame, 1.0, (300, 300),
(104.0, 177.0, 123.0))
# pass the blob through the network and obtain the face detections
faceNet.setInput(blob)
detections = faceNet.forward()
# initialize our list of faces, their corresponding locations,
# and the list of predictions from our face mask network
faces = []
locs = []
preds = []
# loop over the detections
for i in range(0, detections.shape[2]):
# extract the confidence (i.e., probability) associated with
# the detection
confidence = detections[0, 0, i, 2]
# filter out weak detections by ensuring the confidence is
# greater than the minimum confidence
if confidence > args["confidence"]:
# compute the (x, y)-coordinates of the bounding box for
# the object
box = detections[0, 0, i, 3:7] * np.array([w, h, w, h])
(startX, startY, endX, endY) = box.astype("int")
# ensure the bounding boxes fall within the dimensions of
# the frame
(startX, startY) = (max(0, startX), max(0, startY))
(endX, endY) = (min(w - 1, endX), min(h - 1, endY))
# extract the face ROI, convert it from BGR to RGB channel
# ordering, resize it to 224x224, and preprocess it
face = frame[startY:endY, startX:endX]
face = cv2.cvtColor(face, cv2.COLOR_BGR2RGB)
face = cv2.resize(face, (224, 224))
face = img_to_array(face)
face = preprocess_input(face)
# add the face and bounding boxes to their respective
# lists
faces.append(face)
locs.append((startX, startY, endX, endY))
# only make a predictions if at least one face was detected
if len(faces) > 0:
# for faster inference we'll make batch predictions on *all*
# faces at the same time rather than one-by-one predictions
# in the above `for` loop
faces = np.array(faces, dtype="float32")
preds = maskNet.predict(faces, batch_size=32)
# return a 2-tuple of the face locations and their corresponding
# locations
return (locs, preds)
view raw face_detect.py hosted with ❤ by GitHub

2. Load the Face Detector Model and Facemask Detector Model

args = {}
args["face"] = "face_detector"
args["model"] = "mask_detector.model"
args["confidence"] = 0.4
prototxtPath = os.path.sep.join([args["face"], "deploy.prototxt"])
weightsPath = os.path.sep.join([args["face"],
"res10_300x300_ssd_iter_140000.caffemodel"])
faceNet = cv2.dnn.readNet(prototxtPath, weightsPath)
# load the face mask detector model from disk
maskNet = load_model(args["model"])
view raw load_model.py hosted with ❤ by GitHub

3. Initialize the webcam video stream and detect the mask!

print("Starting video stream")
vs = VideoStream(src=0).start()
time.sleep(2.0)
# looping over the frames from the video stream
while True:
# grab the frame from the threaded video stream and resize it to have a maximum width of 800 pixels
frame = vs.read()
frame = imutils.resize(frame, width=800)
# detect faces in the frame and determine if they are wearing a face mask or not
(locs, preds) = detect_and_predict_mask(frame, faceNet, maskNet)
# loop over the detected face locations and their corresponding locations
for (box, pred) in zip(locs, preds):
# unpack the bounding box and predictions
(startX, startY, endX, endY) = box
(mask, withoutMask) = pred
# determine the class label and color we'll use to draw the bounding box and text
label = "Mask" if mask > withoutMask else "No Mask"
color = (0, 255, 0) if label == "Mask" else (0, 0, 255)
# include the probability in the label
label = "{}: {:.2f}%".format(label, max(mask, withoutMask) * 100)
# display the label and bounding box rectangle on the output frame
cv2.putText(frame, label, (startX, startY - 10),
cv2.FONT_HERSHEY_SIMPLEX, 0.45, color, 2)
cv2.rectangle(frame, (startX, startY), (endX, endY), color, 2)
# showing the output frame
cv2.imshow("Frame", frame)
key = cv2.waitKey(1) & 0xFF
# if the `q` key was pressed, break from the loop
if key == ord("q"):
break
cv2.destroyAllWindows()
vs.stop()
view raw video.py hosted with ❤ by GitHub

Cainvas Notebook: Face Mask Detector

YouTube demo : COVID-19: Face Mask Detector

Thank you.

Written by: Ritik Bompilwar

Also Read: Covid-19 Detection